Essential Guide to Trailer Hub and Bearing Maintenance: Protect Your Ride
Posted by The USA Trailer on Jan 8th 2026
Proper hub and bearing maintenance is the most effective way to prevent costly—and potentially dangerous—catastrophic failures on the road. Knowing the difference between routine hub greasing and full bearing repacks helps you travel with confidence and keep your adventures uninterrupted.
It’s important to understand there are two types of maintenance, and they aren’t the same: hub greasing and bearing repacking. Greasing the hub is a routine top-off that helps maintain lubrication and can help purge minor moisture or contamination, making it a smart habit before long trips, after wet-weather towing, or after extended storage.
Repacking the bearings is the full service. It involves removing the hub, pulling the bearings, inspecting and cleaning the components, then packing the bearings with fresh grease and reinstalling everything with the correct adjustment. This deeper maintenance is what catches wear and helps prevent breakdowns or failures.
NOTE: When purchasing a new trailer from The USA Trailer Store, you must grease the bearings within the first 1,000 miles! That initial break-in period is when parts seat and any early debris or grease distribution issues are most likely to show up. After initial application, under normal circumstances you should regrease every 2000 miles and repack yearly or every 10000 miles, whichever comes first.
Why Hub and Bearing Maintenance is Crucial
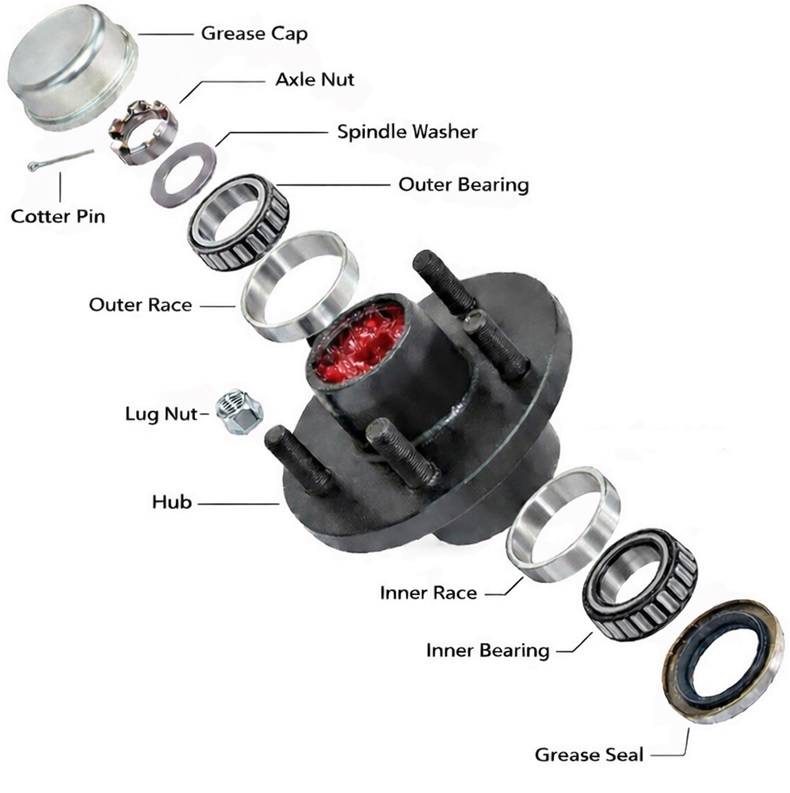
Trailer wheel hubs and bearings are hardworking components. The hub is the central part of the wheel that connects to the axle, while the bearings inside it allow the wheel to spin with minimal friction. These bearings support the entire weight of your trailer and its cargo, enduring constant rotation, heat, and pressure every mile you travel.
Proper lubrication is the key to their longevity. Grease inside the hub protects the bearings from friction, heat, and corrosion. Over time, this grease breaks down, gets contaminated with dirt and water, or simply leaks out. Without sufficient, clean grease, the bearings will fail.
Neglecting this simple maintenance can lead to a range of issues, from minor inconveniences to failures that can endanger you and other drivers on the road. Regular inspection and servicing are not just about protecting your investment; they are fundamental to safe towing.
What Happens If I Don't Grease My Trailer Bearings? (The Dangers of Neglect)
Think of your trailer's bearings as the foundation of its mobility. When they fail, the consequences can be severe.
- Overheating: Without proper lubrication, friction builds up rapidly, causing the hub to overheat. An extremely hot hub is a clear warning sign that a bearing failure is imminent. This heat can damage the hub, spindle, and even the wheel itself.
- Complete Bearing Failure: The bearings can disintegrate, seizing the wheel and preventing it from turning. If this happens at high speed, you could lose control of your vehicle and trailer.
- Wheel Detachment: In the most extreme cases, a failed bearing can cause so much damage that the entire wheel assembly separates from the axle. A loose wheel bouncing down the highway is a life-threatening hazard for everyone.
These scenarios highlight why proactive maintenance is non-negotiable. A few hours of work in your garage can prevent a dangerous and expensive breakdown on the side of the road.
How to Grease the Bearings
Below is a step-by-step guide to greasing the bearings.
- You’ll need a grease gun and the correct wheel-bearing grease, plus basic hand tools and a rag for cleanup.
- Park and secure the trailer. Place the trailer on a level surface, chock the wheels, and make sure it can’t roll (ideally, also attach it to a tow vehicle)
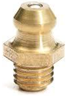
● Locate the Zerk fitting. Find the grease (Zerk) fitting on the hub-it's usually behind the dust cover or behind the wheel on the hub.
- Clean the fitting. Wipe dirt and grit off the Zerk fitting so you don’t push contamination into the hub.
- Attach the grease gun. Snap the grease gun coupler firmly onto the Zerk fitting.
- Slowly pump grease into the Zerk. Continue until you see fresh grease begin to emerge from the outside/front of the bearing.
- Stop when grease appears. Once grease is visibly coming out, stop pumping—at that point the hub has been greased.
- Wipe away excess. Clean off any extra grease around the hub and fitting to help keep dirt from sticking.
- Be sure to reinstall dust cap if removed.
- A new trailer requires grease after the first 1,000 miles. Then grease the hubs at least every 2,000 miles.
- Increase maintenance frequency for harsh conditions. Hot climates, high-speed towing, frequent wet or dusty locations, all require inspection and greasing the hubs more often.
How to Repack Bearings
Here is a step-by-step guide for repacking bearings, which should be done every year or 10,000 miles, whichever comes first.
Understanding Your Bearings: Components and Terminology
Before diving into the steps of repacking the bearings, it is critical to understand the key technical components you will be inspecting.
|
Races: These are the smooth, precision-machined steel rings seated inside the hub. The bearing rollers ride directly on the inner surface of the race. Any pitting, scoring, or discoloration on the race surface is a non-negotiable sign that the race and the corresponding bearing must be replaced. In some -instances, the most efficient remedy may be to install an entire new hub assembly as removing and replacing a race may require a press.
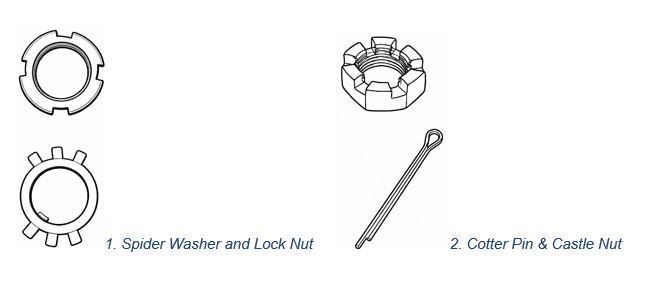
Cotter Pin or Spider Washer: Simple but vital safety devices used to secure the axle nut on the spindle. It prevents the nut from backing off under vibration and ensures the correct bearing tension is maintained. |
 |
Never reuse a cotter pin, bearing seal, or spider washer. Always replace these with new ones.
Tools and Supplies Needed:
- Jack and jack stands
- Lug wrench
- Adjustable wrench
- Torque wrench
- Pliers or channel locks
- Flathead screwdriver or seal puller
- Bearing race punch
- Hammer and a block of wood
- New grease seals
- New cotter pin or spider washer
- High-temperature wheel bearing grease
- Solvent for cleaning (like brake cleaner or mineral spirits)
- Clean rags or paper towels
- Safety glasses and gloves
Step 1: Raise and Secure the Trailer
Park the trailer on a level surface and keep it hitched to the tow vehicle, with the vehicle in Park and the parking brake set. Chock the wheels on the opposite side to prevent rolling. Loosen the lug nuts on the wheel you will be working on before lifting it off the ground.
Using a jack, raise the trailer until the tire is clear of the ground. Place a jack stand securely under the trailer's frame or axle for support. Never work on a trailer that is only supported by a jack. Once the jack stand is in place, you can remove the lug nuts and take off the wheel.
Step 2: Remove the Hub Assembly
With the wheel removed, you will see the hub assembly. At its center it may have a dust cap. You can pry this off using a flathead screwdriver or a pair of channel locks. Be gentle to avoid denting it, as you will need to reuse it.
Behind the dust cap, you will find a cotter pin or spider washer and an axle nut. Straighten the legs of the cotter pin with pliers and pull it out. If you have s spider washer, bend over the tabs. Then, unscrew the axle nut. After the nut is off, you should be able to pull the entire hub assembly straight off the axle spindle. A bearing may fall out as you do this, so be ready to catch it.
Step 3: Disassemble and Clean the Hub
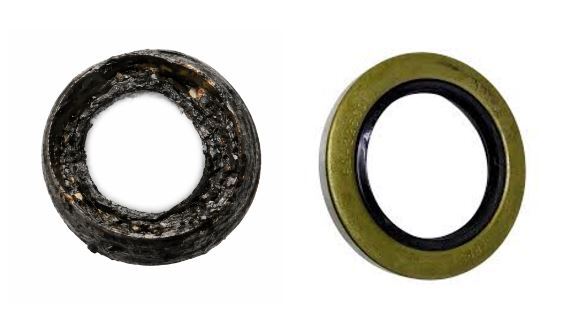
Place the hub on a clean workbench. On the back side of the hub, you will see the grease seal. You need to pry this out to access the inner bearing. A seal puller is the best tool for this, but a large flathead screwdriver will also work. Pry carefully to avoid scratching the inside of the hub. Once the seal is out, you can remove the inner bearing.
It is important to always replace the grease seal with a new one. Old seals can be damaged during removal and will not provide a reliable barrier against dirt, water and loss of grease.
With both bearings removed, use a cleaning solvent and rags to thoroughly clean all the old grease from the inside of the hub, the bearings, and the axle spindle. This will prepare the components for the next step.
Step 4: Inspect Components for Damage
This is a critical step. Carefully examine all parts for wear and tear.
- Bearings: Look at and move the rollers on each bearing. They should be shiny and unblemished, with smooth action. If you see any pitting, rust, discoloration from heat (often a blue or purple tint), flat spots, or feel any binding/skipping, the bearing must be replaced.
- Races: Inspect the inner and outer races inside the hub. Their surfaces should also be perfectly smooth. Any gouges, scratches, or pitting means the races need to be replaced. Replacing races often requires specialized tools and equipment such as a press. -Replacing these may require the help of a local mechanic. Or you can replace the hub at a minimal cost.
- Spindle: Check the axle spindle for any scoring, heat damage, or excessive wear. The surfaces where the bearings and seal ride should be smooth. Any significant damage to the spindle may require professional repair or axle replacement.
A close-up photo of a rusted and pitted bearing next to a new, clean bearing would powerfully illustrate what to look for.
Step 5: Pack the Bearings with New Grease
Properly packing bearings with grease is essential for them to function correctly. You cannot just smear grease on the outside. The grease needs to be forced into the space between the rollers and the cage.
You can do this by hand or with a bearing packer tool. To pack by hand, put a large dollop of high-temperature wheel bearing grease in the palm of your hand. Take one of the clean bearings and press the wider end into the grease. Keep forcing the grease into the bearing until it begins to ooze out of the narrower end. Rotate the bearing and repeat this process until it is completely filled.
Apply a light coat of grease to the races inside the hub as well. This will help the newly packed bearings slide in easily.
Step 6: Reassemble the Hub
Now it is time to put everything back together.
- Install the Inner Bearing: Place the newly packed inner bearing into its race on the back side of the hub.
- Install the New Grease Seal: Lightly grease the seal lip and the spindle surface where the seal rides. Place the new grease seal on top of the inner bearing. Use a hammer and a block of wood (or a seal driver) to gently and evenly tap the seal into place. Make sure you do not drive the seal too far down. Ensure it is flush with the hub.
- Mount the Hub: Carefully slide the hub assembly back onto the axle spindle. Be careful not to damage the new grease seal on the spindle threads.
- Install the Outer Bearing: Insert the packed outer bearing into its race on the front of the hub.
- Secure with the Axle Nut: First install the spindle washer. Then screw on the axle nut. Correct tightness is very important. Tighten the nut to 60 ft-lb while spinning the hub. Then without moving the hub, back the nut off one full turn. From here, tighten the nut until it is just snug (NOT TIGHT), then back off about 1/12th turn (~ 30°). This ensures the bearings are properly seated first, then allows for the appropriate tightness to be achieved. The hub should spin freely, without any side-to-side play.
- Insert the Cotter Pin: Turn the axle nut slightly and only enough to align one slot of the axle nut with the cotter-pin hole in the spindle. Do not overtighten or advance the nut further, as this will alter the bearing preload established in Step 5 above. Install a new cotter pin and secure it by bending the legs of the pin. Never reuse an old cotter pin. Look for this alignment when tightening the nut in previous step.
- Replace the Dust Cap: Taking care not to damage it, tap the dust cap back into place with a hammer and a block of wood.
- Reinstall the Wheel: Mount the wheel and tighten the lug nuts in a star pattern. Lower the trailer off the jack stand and use a torque wrench to tighten the lug nuts to the manufacturer's specification.
PRO SAFETY TIP: Torque is Key! While the castle nut secures the bearings, the lug nuts secure the wheel to the hub. Always use a torque wrench to tighten the wheel lug nuts to the manufacturer’s specified setting (measured in Foot-Pounds or Newton-Meters).
Incorrectly torqued lug nuts are a primary cause of stud shearing and wheel detachment. Refer to your trailer or axle manual for the exact specification.
After your first trip, it is a good idea to check the hub temperature by hand. It should be warm to the touch, but not too hot to hold. Also, recheck the lug nut torque.
Common Issues Caused by Lack of Maintenance
Example 1: Rusted and Corroded Bearings
Water is the enemy of wheel bearings. If a grease seal fails, water can seep into the hub, contaminating the grease and causing the bearings to rust. Rusted bearings will quickly fail, leading to excessive heat and noise.
Example 2: Overheated and Damaged Hub
When a bearing fails due to lack of lubrication, the resulting friction generates immense heat. This heat can cause the grease to liquefy and leak out, making the problem worse. The hub can become so hot that it discolors the metal and damages the spindle.
Example 3: Worn Out and Scored Components
A bearing that has started to fall apart will grind against the spindle and the hub races. This can cause deep grooves and scoring on these surfaces. If the damage is severe, the entire hub and even the axle spindle may need to be replaced, turning a simple maintenance task into a major repair.
Frequently Asked Questions: Trailer Hub & Bearing Maintenance
Q: How often should I pack my trailer hubs and bearings?
A: For most trailers, it's recommended to inspect and service the hubs and bearings at least once a year or every 10,000 miles—whichever comes first. If you travel frequently in wet or dusty conditions, check them more often to maintain reliable performance. Hot weather and excessive speeds also require maintenance more often.
Q: What are signs my bearings need attention?
A: Watch for warning signs like unusual noise while towing, a noticeable wheel wobble, the hub feeling hot to the touch, or visible grease leakage. These symptoms suggest it’s time for immediate inspection and maintenance.
Q: Can I do this maintenance myself?
A: Yes, you can! With basic tools and clear instructions, many people choose to handle hub and bearing service at home. Refer to the step-by-step guide above for straightforward, detailed directions.
Q: What kind of grease should I use?
A: Always use a high-temperature, water-resistant wheel bearing grease formulated for trailers. This type of grease gives the best protection against friction and harsh weather conditions.
Q: Do I always need to replace the grease seals?
A: Absolutely. Old seals can become damaged during removal and may allow dirt or water into the hub, increasing the risk of bearing failure. Always install new seals each time you service your bearings.
Q: What happens if I neglect this maintenance?
A: Neglecting routine hub and bearing care can quickly lead to bearing failure, overheating, or even catastrophic wheel detachment. These problems are fully preventable with regular inspections and maintenance, a small investment of time for peace of mind and trouble-free travel.
Investing in Your Safety and Peace of Mind
Taking the time to service your trailer's wheel hubs and bearings is one of the most important things you can do to ensure a safe and trouble-free journey. It is a straightforward process that offers an enormous return on investment, preventing costly repairs and dangerous on-road failures.
By following these steps, you can keep your trailer in top condition and tow with the confidence that comes from knowing your equipment is reliable. Your adventures are waiting, and with a well-maintained trailer, you will be ready to meet them.